This post if part of the “Updating embedded Linux devices” series, previous posts are:
- Updating Embedded Linux Devices: Background
- Updating Embedded Linux Devices: Update strategies
- Updating Embedded Linux Devices: SWUpdate
Next up on my software update journey is:
My introduction with Mender was back in 2016. They where sponsors of ELCE (Embedded Linux Conference Europe) 2016 and that is how first found a link to mender.io. I had an interest for firmware updates on embedded Linux already back then I had to try it out.
Back then they only supported QEMU and Beaglebone Black machines but I wanted to test this out on my Raspberry Pi. Which lead to me porting Mender to Rasbperry Pi boards and pushing it upstream. I have since then been a community member of the project with various contributions.
But what is Mender?
Mender is an open-source over-the-air firmware updater for embedded Linux devices, written in Golang. There is a blog post that reasons on the choice of Golang over C. Mender consists of a client that runs on your device but also a complete server side solution in which you can manage your software deployments, which also open-source. Mender is licensed under Apache 2.0.
Mender was developed by a commercial entity, https://northern.tech/. They are still the main contributers to the project, though the community side of the project has also grown and is quite active as well. This is a quite common layout now days, and in my opinion it is handled very well in this case. Mender has 35 repositories on their github organization, which includes client, server, QA and tooling. The project has also an open issue tracker where you can get insight in what is currently worked on and external users can create new issues. All this means that the entity behind Mender is serious with this being a fully open-source project.
Lets get technical.
Mender is not a framework, compared to the previous project I covered. Instead Mender aims to be a robust out-of-the box end-to-end solution to deploy a “Dual Copy” update strategy on your device.
Key features are:
- Deployment management server part of the project
- Fully atomic image based updates
- Secure TLS communication between client/server
- Automated rollback implemented out-of-the box
- Support for signed update images
- Support for compressed update images which are streamed from server straight to storage medium
- Scripting support for custom application actions and control of update process
- Support of resuming download of update image, in case of unstable data connections
- Support for writing eMMC/SD and UBI volumes.
- Comprehensive QA system on reference boards
There is a lot more which can be found here.
As I have mentioned earlier, Mender deploys a “Dual Copy” update strategy which means that it is only able to do full image updates.
Mender has the following requirements:
- Mender client is roughly 7 MB
- Partition layout of you storage medium (two partitions for root file-system, and one data partition (persistent data storage))
- Mender relies on U-boot (2014.07 or newer) for rollback and to switch active partition
- Yocto Project, in theory you could install Mender independently but you get a lot when you use their Yocto layers.
There is a blog post on how to integrate Mender on non-Yocto system. There is no need for me to duplicate this here, this means that we will start off using Yocto.
My idea is to build a system image for my Beaglebone Black using Yocto and then:
- Try out the Mender client on target and perform updates using the standalone mode, that is without utilizing the Mender server component
- Try out OTA updates using Mender server component
Lets start of with setting up our Yocto environment:
|
1 2 3 4 5 6 7 8 9 |
$ mkdir mender-yocto && cd mender-yocto mender-yocto$ mkdir layers && cd layers mender-yocto/layers$ git clone git://git.yoctoproject.org/poky -b rocko mender-yocto/layers$ git clone https://github.com/mendersoftware/meta-mender -b rocko mender-yocto/layers$ cd .. mender-yocto$ . layers/poky/oe-init-build-env build mender-yocto/build$ bitbake-layers add-layer ../layers/meta-mender/meta-mender-core mender-yocto/build$ bitbake-layers add-layer ../layers/meta-mender/meta-mender-demo |
Before I can start baking an image I must add some configuration options to local.conf.
First off we must set our desired machine.
|
1 2 |
MACHINE = "beaglebone" |
To add all the features that Mender has to offer we must add the following.
|
1 2 |
INHERIT += "mender-full" |
Mender currently relies on systemd for a seamless experience, this means that a systemd service is provided by default for the Mender client and meta-mender-demo has some additional dependencies on systemd-networkd. But there is not really a “hard” requirement to run systemd. Lets keep it simple and make sure that systemd is used in our setup as well.
|
1 2 3 4 5 |
DISTRO_FEATURES_append = " systemd" VIRTUAL-RUNTIME_init_manager = "systemd" DISTRO_FEATURES_BACKFILL_CONSIDERED = "sysvinit" VIRTUAL-RUNTIME_initscripts = "" |
When we bake our image a Mender artifact will be created for us. This is the file that we eventually will provide to the Mender client to perform the update. This artifact contains version information that is set during build time, and it is required to set this in our local.conf. “Different” images must have a different name/version because Mender uses this string to rapport what software the device is running an will skip updating if device is running an image with the same name/version.
|
1 2 |
MENDER_ARTIFACT_NAME = "starship-discovery" |
Now we can start baking
|
1 2 |
mender-yocto/build$ bitbake core-image-full-cmdline |
The Yocto setup process is also very well documented on Mender documentation site.
From the build output there are two files that are of interest for us.
*.sdimg– This is the complete disk image that is partitioned according to Mender requirements and this will be written to our device as a first step. The partions that are created are:- bootpart (vfat) – Contains U-boot and MLO for the Beaglebone Black. This part is optional as some boards store the bootloader at a certain offset and not on a vfat partition
- rootfsA – Our root file-system that we built using
core-image-full-cmdlineand this is what will initially be booted. - rootfsB – Same as above but this part will initially be inactive and this is where we will write our next update.
- data – Persistent data partition that is not effected by updates. This part is required as the Mender client will store some data here as well while performing an update.
*.mender– This is the file that we provide to the Mender client to perform an update. The contents is simply a filesystem image, plus some additional meta data. See here for more info on the Mender artifact file-format.
This time around I will be using the uSD card on my Beaglebone and not the on-board eMMC. This is because by default Mender assumes that our storage device is mmcblk0 which is the uSD interface on the Beaglebone Black. This is of course configurable and we could have easily have changed this, but lets stick to the defaults and use the uSD.
Lets write the sdimg to a uSD card
|
1 2 |
$ dd if=core-image-full-cmdline-beaglebone.sdimg of=/dev/mmcblk0 bs=1M |
Eject and inject the uSD to the BBB and power-on. Once booted we will see that we now have the Mender client installed
|
1 2 3 4 5 6 7 8 9 10 11 12 13 14 15 16 17 18 19 20 21 22 23 24 25 26 27 28 29 30 31 32 33 34 35 36 37 |
root@beaglebone:~# mender --help Usage of mender: -bootstrap Perform bootstrap and exit. -commit Commit current update. Returns (2) if no update in progress -config string Configuration file location. (default "/etc/mender/mender.conf") -daemon Run as a daemon. -data string Mender state data location. (default "/var/lib/mender") -debug Debug log level. This is a shorthand for '-l debug'. -f force installation of artifacts with state-scripts -forcebootstrap Force bootstrap -info Info log level. This is a shorthand for '-l info'. -log-file string File to log to. -log-level string Log level, which can be 'debug', 'info', 'warning', 'error', 'fatal' or 'panic'. Earlier log levels will also log the subsequent levels (so 'debug' will log everything). The default log level is 'info'. -log-modules string Filter logging by module. This is a comma separated list of modules to log, other modules will be omitted. To see which modules are available, take a look at a non-filtered log and select the modules appr opriate for you. -no-syslog Disable logging to syslog. Note that debug message are never logged to syslog. -rootfs string Root filesystem URI to use for update. Can be either a local file or a URL. -skipverify Skip certificate verification -trusted-certs string Trusted server certificates -version Show mender agent version and exit. |
Mender is also already running in “daemon” mode.
|
1 2 3 4 5 6 7 8 9 10 11 |
root@beaglebone:~# systemctl status mender ● mender.service - Mender OTA update service Loaded: loaded (/lib/systemd/system/mender.service; enabled; vendor preset: enabled) Active: active (running) since Sat 2000-01-01 00:00:10 UTC; 3min 37s ago Process: 201 ExecStartPre=/bin/ln -sf /etc/mender/tenant.conf /var/lib/mender/authtentoken (code=exited, status=0/SUCCESS) Process: 198 ExecStartPre=/bin/mkdir -p -m 0700 /data/mender (code=exited, status=0/SUCCESS) Main PID: 202 (mender) Tasks: 5 (limit: 4915) CGroup: /system.slice/mender.service ─202 /usr/bin/mender -daemon |
Daemon mode is used when you connect to a Mender server to do OTA updates, we can keep it running even though we will not be using this part yet.
We can read-out the artifact info that we setup in our Yocto environment.
|
1 2 3 |
root@beaglebone:~# cat /etc/mender/artifact_info artifact_name=starship-discovery |
We can also see that our uSD is partitioned according to what Mender expects.
|
1 2 3 4 5 6 7 8 9 10 11 12 13 14 |
root@beaglebone:~# fdisk -l /dev/mmcblk0 Disk /dev/mmcblk0: 14.9 GiB, 15931539456 bytes, 31116288 sectors Units: sectors of 1 * 512 = 512 bytes Sector size (logical/physical): 512 bytes / 512 bytes I/O size (minimum/optimal): 512 bytes / 512 bytes Disklabel type: dos Disk identifier: 0x13dabf82 Device Boot Start End Sectors Size Id Type /dev/mmcblk0p1 * 49152 81919 32768 16M c W95 FAT32 (LBA) /dev/mmcblk0p2 81920 507903 425984 208M 83 Linux /dev/mmcblk0p3 507904 933887 425984 208M 83 Linux /dev/mmcblk0p4 933888 1196031 262144 128M 83 Linux |
If we inspect what is actually mounted.
|
1 2 3 4 5 |
root@beaglebone:~# mount | grep mmc /dev/mmcblk0p2 on / type ext4 (rw,relatime,data=ordered) /dev/mmcblk0p1 on /uboot type vfat (rw,relatime,sync,fmask=0022,dmask=0022,codepage=437,iocharset=iso8859-1,shortname=mixed,errors=remount-ro) /dev/mmcblk0p4 on /data type ext4 (rw,relatime,data=ordered) |
We can see that mmcblk0p2 is the current active root file-system and that makes the mmcblk0p3 the inactive one. We can also see that it has mounted mmcblk0p4 on /data and that is our persistent partition and anything we store there will be left un-touched by updates. The bootpart is also mounted to /uboot.
I earlier mentioned that I wanted to perform an update using the standalone mode. So lets do that. We must somehow provide the .mender file to the Mender client, I copied it to the persistent data partition (I was lacking network at the time of writing as we could have also shared the file with a simple HTTP server).
|
1 2 3 |
root@beaglebone:~# ls /data/ core-image-full-cmdline-beaglebone.mender lost+found mender persistent.txt u-boot |
Now we can run a update.
|
1 2 3 4 5 6 7 8 9 10 11 12 13 14 15 16 17 18 19 20 21 22 23 24 25 26 27 28 29 30 31 32 33 34 35 36 37 38 39 40 41 42 43 44 45 |
root@beaglebone:~# mender -rootfs /data/core-image-full-cmdline-beaglebone.mender INFO[0000] Start updating from local image file: [/data/core-image-full-cmdline-beaglebone.mender] module=rootfs Installing update from the artifact of size 38288384 INFO[0000] opening device /dev/mmcblk0p3 for writing module=block_device INFO[0000] partition /dev/mmcblk0p3 size: 218103808 module=block_device ................................ 2% 1024 KiB ................................ 5% 2048 KiB ................................ 8% 3072 KiB ................................ 10% 4096 KiB ................................ 13% 5120 KiB ................................ 16% 6144 KiB ................................ 19% 7168 KiB ................................ 21% 8192 KiB ................................ 24% 9216 KiB ................................ 27% 10240 KiB ................................ 30% 11264 KiB ................................ 32% 12288 KiB ................................ 35% 13312 KiB ................................ 38% 14336 KiB ................................ 41% 15360 KiB ................................ 43% 16384 KiB ................................ 46% 17408 KiB ................................ 49% 18432 KiB ................................ 52% 19456 KiB ................................ 54% 20480 KiB ................................ 57% 21504 KiB ................................ 60% 22528 KiB ................................ 62% 23552 KiB ................................ 65% 24576 KiB ................................ 68% 25600 KiB ................................ 71% 26624 KiB ................................ 73% 27648 KiB ................................ 76% 28672 KiB ................................ 79% 29696 KiB ................................ 82% 30720 KiB ................................ 84% 31744 KiB ................................ 87% 32768 KiB ................................ 90% 33792 KiB ................................ 93% 34816 KiB ................................ 95% 35840 KiB ................................ 98% 36864 KiB ................INFO[0114] wrote 218103808/218103808 bytes of update to device /dev/mmcblk0p3 module=device 100% 37391 KiB INFO[0117] Enabling partition with new image installed to be a boot candidate: 3 module=device |
Now we must reboot so that it can switch root file-system parts.
|
1 2 |
root@beaglebone:~# reboot |
And now we can see that it has changed root file-system part, making the initial mmcblk0p2 the inactive one.
|
1 2 3 4 5 |
root@beaglebone:~# mount | grep mmc /dev/mmcblk0p3 on / type ext4 (rw,relatime,data=ordered) /dev/mmcblk0p1 on /uboot type vfat (rw,relatime,sync,fmask=0022,dmask=0022,codepage=437,iocharset=iso8859-1,shortname=mixed,errors=remount-ro) /dev/mmcblk0p4 on /data type ext4 (rw,relatime,data=ordered) |
One interesting thing though.
|
1 2 3 |
root@beaglebone:~# cat /etc/mender/artifact_info artifact_name=starship-discovery |
We still have the same artifact name but I earlier said that it will skip updating if it sees that the artifact matches what is already running on the device. This is only true when performing OTA updates, and this check is skipped when running updates in standalone mode.
There is one last step to perform to actually make this persistent.
|
1 2 3 |
root@beaglebone:~# mender -commit INFO[0000] Commiting update module=device |
If we do not “commit” the update Mender would have rolled back to the previous part on the next reboot. This is the mechanism that is used to prevent corrupt/bad software updates. If the new update does not boot, it will not be able to run mender -commit (obviously) and that will make sure that Mender rolls back to the previous partition that is known to be good as it was the one that initiated the update after all. One can also run addition tests before running the mender -commit command, but this is highly application specific.
This was simple enough. Now I would like to try out OTA updates. And for that we need a server for our devices to connect to. I am going to be a bit lazy here and use the Mender Hosted (Beta) server for which I have access and I am allowed to have 10 device connected to it.
It is well documented on how you setup your own server and Mender provides two examples:
To get my BBB to connect to my instance of the Mender server we need to go back to Yocto and do some addition configuration.
We must setup the URL.
|
1 2 |
MENDER_SERVER_URL = "https://hosted.mender.io" |
And we must the provide the tenant token (this requires an account on hosted.mender.io).
|
1 2 |
MENDER_TENANT_TOKEN = "<secret>" |
The tenant token is only used the Hosted Mender (beta). For the Demo and Production environments the /etc/mender/server.crt file is used to authenticate the device to your server. The server.crt for the demo environment is provided by default without any changes. For the production environment you must replace the demo server.crt with your custom one that you generated when you setup the environment.
And now we must re-bake our image to make sure that this is added.
|
1 2 |
mender-yocto/build$ bitbake core-image-full-cmdline |
Once it has finished we will use the sdimg once again to start of fresh.
|
1 2 |
$ dd if=core-image-full-cmdline-beaglebone.sdimg of=/dev/mmcblk0 bs=1M |
Eject and inject to the BBB and power on.
Now I made sure that my BBB also has a Internet connection and I can see that it was able to connect to my server.
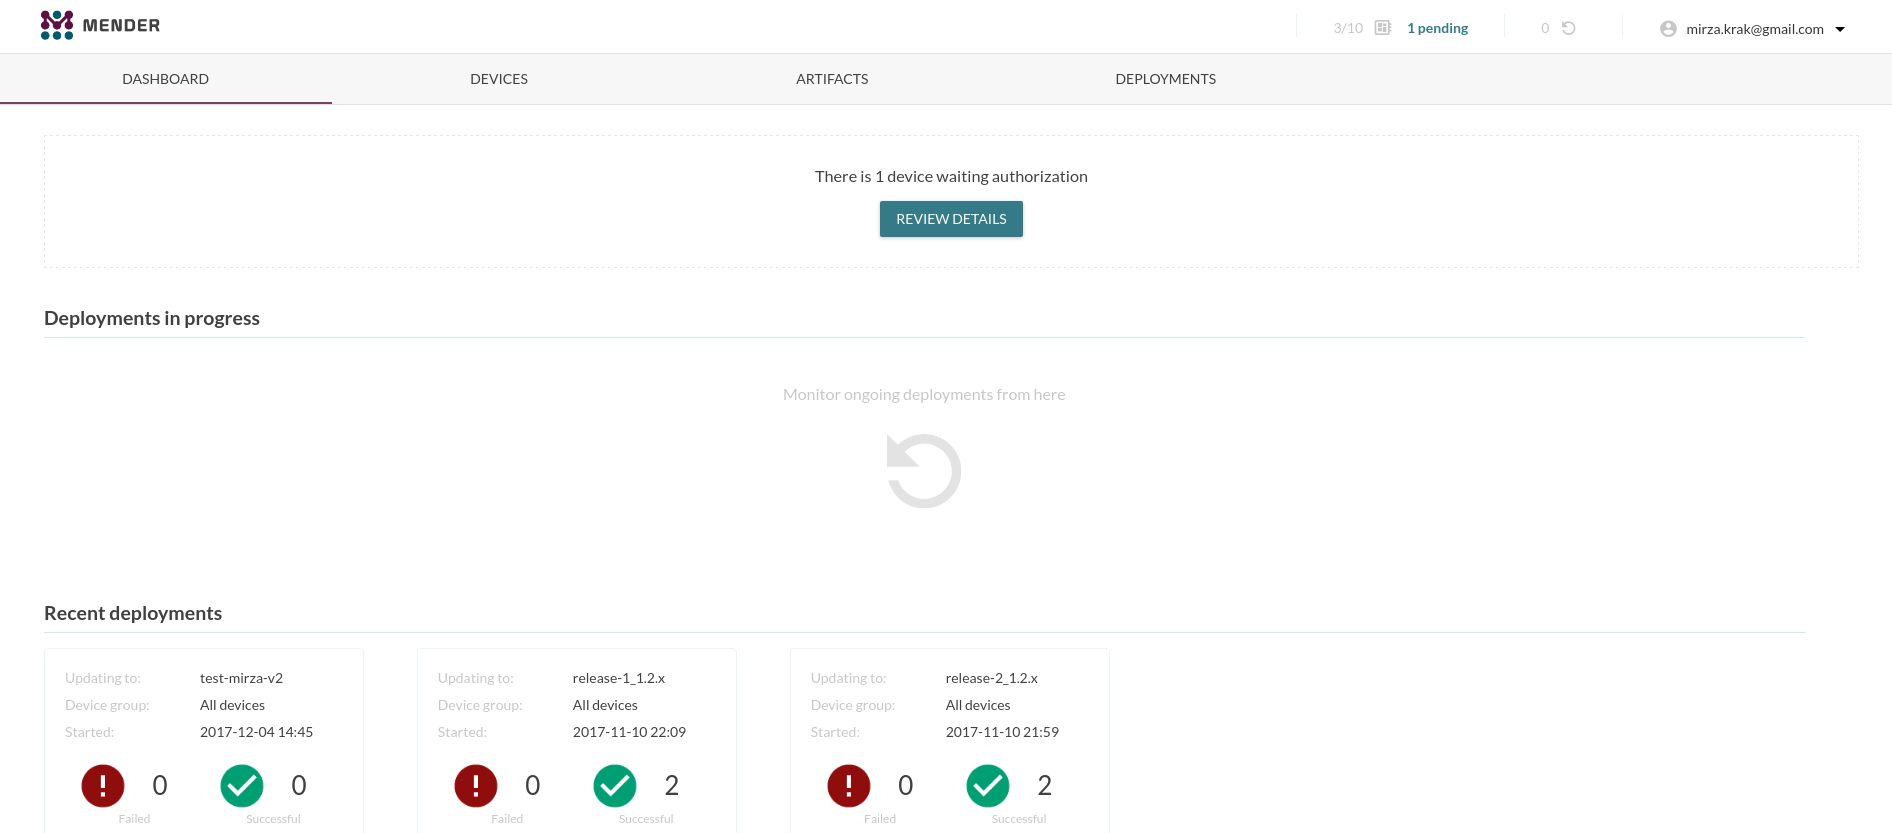
Before we can deploy any updates to device we must first authorize the device and give it full access to the server. This is a one-time thing, the next time the device connects to the server it will have full access. There are options on the server to “block” or “decommission” devices en-forcing the authorization step once again.
But I need to move to the “Devices” page and click the green button to accept my BBB.

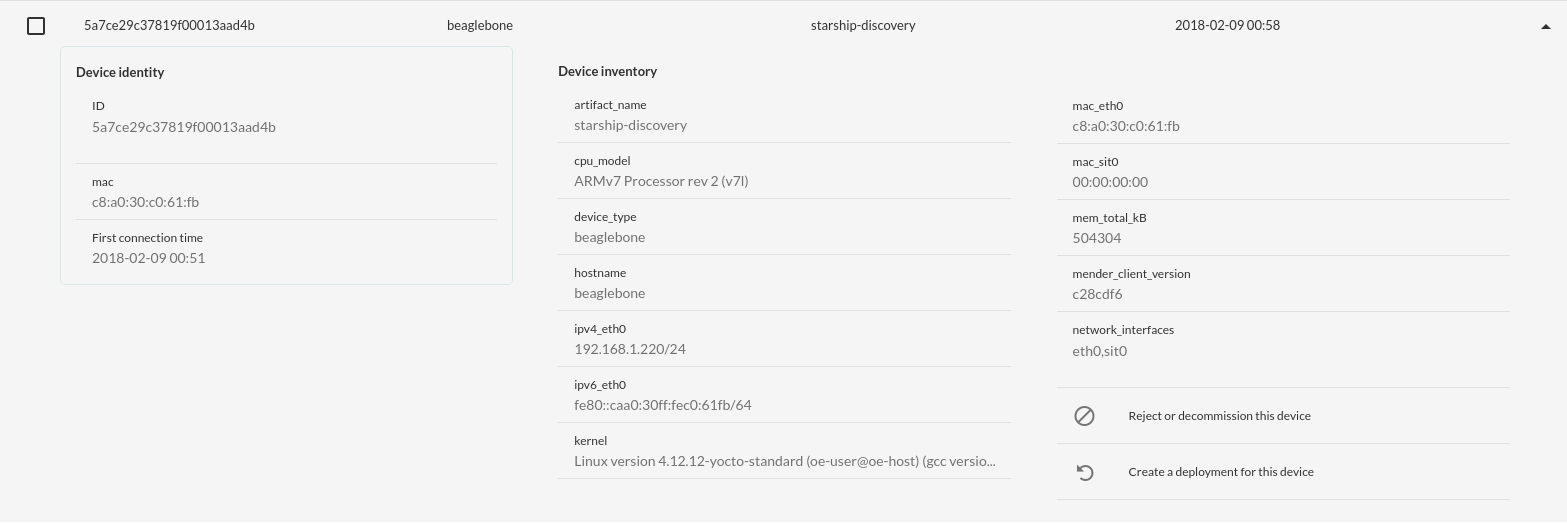
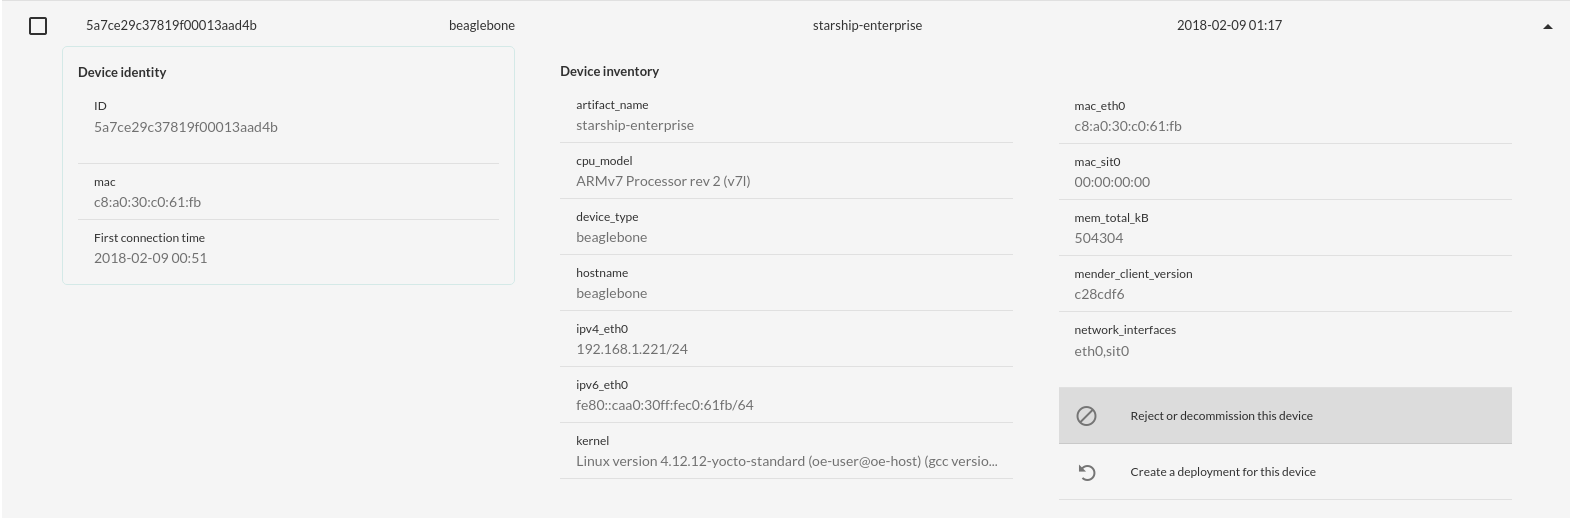
Once I have done that I am able to get some additional information about my device and here we see that we are running the starship-discovery artifact on a Beaglebone Black.
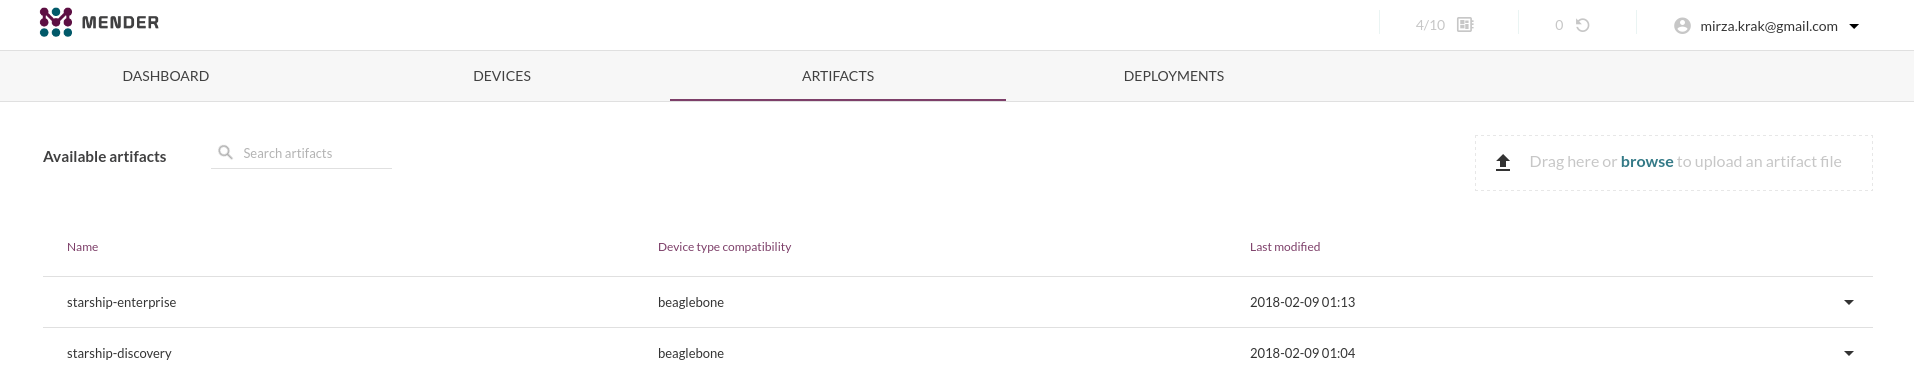
To be able to deploy new software we must upload the artifacts (.mender files) to the server under the “Artifacts” view. Lets start of with uploading the starship-discovery artifact that was created in our latest build. Note that we can not deploy this at the current state as this is already what is present on our device.
Now we must create a second artifact that is not starship-discovery in our Yocto environment. We update the MENDER_ARTIFACT_NAME.
|
1 2 |
MENDER_ARTIFACT_NAME = "starship-enterprise" |
And bake.
|
1 2 |
mender-yocto/build$ bitbake core-image-full-cmdline |
Now we can upload the .mender file that was generated with above build. And the result on the server looks like this.
And now I can start updating my BBB since I have two different images (though the content is the same). I am not going to do a “step-by-step” instruction on how to do deployments as it is pretty straightforward and I do not want to spam this post with screen-shoots (already to late?).
But this is what it looks like once the deployments has started.
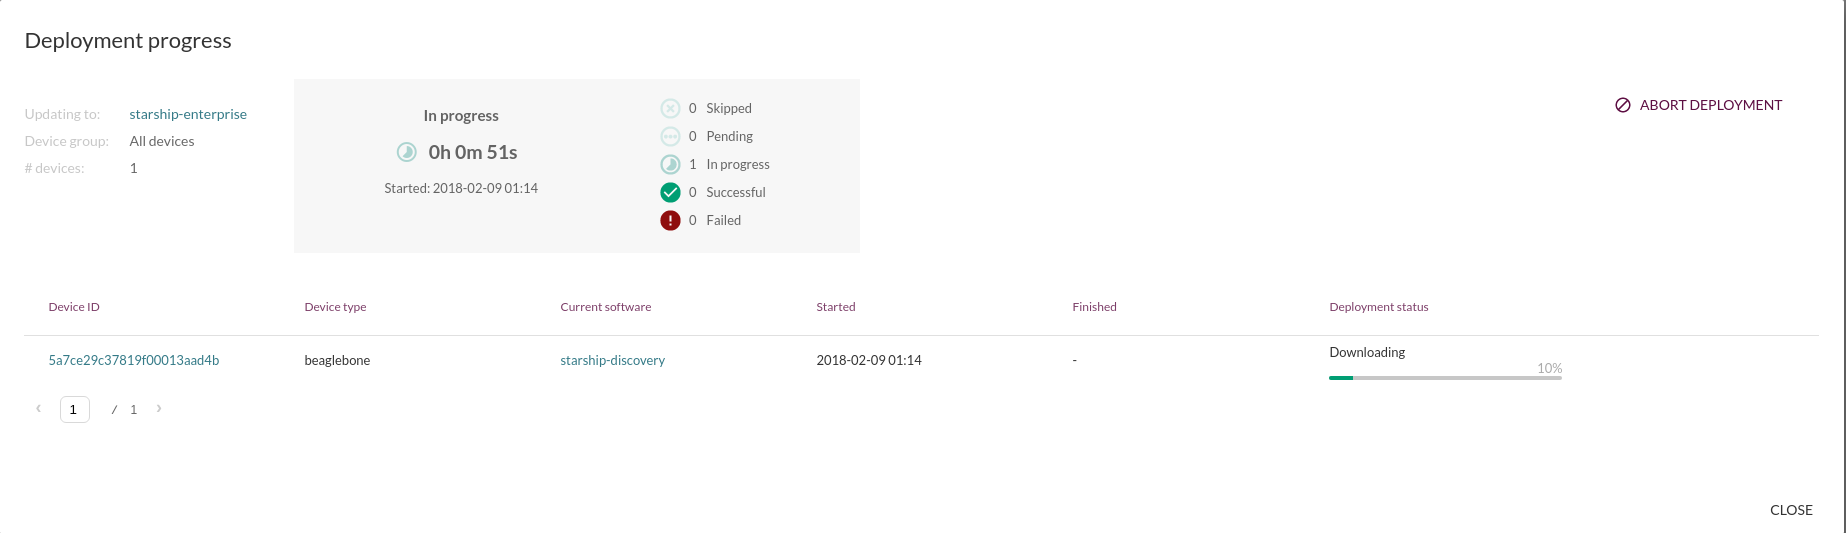
Pretty neat overview of what is going on and we can follow the state changes live as it progresses trough the update.
And if we go back to the “Devices” page once the deployment has finished we can now see that my BBB is running the starship-enterprise artifact.
Conclusion
The project has fantastic documentation and if I have caught your interest continue reading here.
Mender has been around for a while and has a lot to offer and because it enforces the “Dual Copy” strategy they are really able to optimize for this specific use case. The Mender project has also put a lot of effort on integration tests that run on real-hardware (BBB and RPi3) and qemu, and I really get that feeling when using it (it just works).
It is a big plus that the deployment management server is integrated in the project and the connection from client to server is seamless. It is relatively easy to setup the server due to usage of docker and docker-compose.
Of course it does not fit everybody. Maybe it is not possible to deploy a “Dual Copy” strategy on your device (due to size constraints) or image based updates are not possible due to bandwidth costs but if you are thinking of deploying a “Dual Copy” strategy on you device then it is probably best to choose a project that focuses on that specific use-case.
The content of this article is very helpful to me, thank you.
Mirzak,
Here is my own clone and build steps.
mkdir mender-yocto && cd mender-yoctomkdir layers && cd layers3.
git clone git://git.yoctoproject.org/poky -b rockogit clone https://github.com/mendersoftware/meta-mender -b mortygit clone git://git.yoctoproject.org/meta-raspberrypicd ..bitbake-layers add-layer ../layers/meta-mender/meta-mender-corebitbake-layers add-layer ../layers/meta-raspberrypibitbake-layers add-layer ../layers/meta-mender/meta-mender-raspberrypiWhy I switch branch from rocko to morty. Ref this link.Building a Mender Yocto image for a Raspberry
I am still confuse with those different branch usage.
bblayer.conf content show below
update local.conf ref Building a Mender Yocto Project image
When execute
bitbake core-image-full-cmdline. Error message is below.The stack trace of python calls that resulted in this exception/failure was:
File: ‘
', lineno: 15, function:0011:__anon_25__home_zxp_mender_yocto_layers_poky_meta_classes_debian_bbclass(d)
0012:__anon_35__home_zxp_mender_yocto_layers_poky_meta_classes_devshell_bbclass(d)
0013:__anon_106__home_zxp_mender_yocto_layers_poky_meta_classes_sstate_bbclass(d)
0014:__anon_45__home_zxp_mender_yocto_layers_poky_meta_classes_blacklist_bbclass(d)
*** 0015:__anon_6__home_zxp_mender_yocto_layers_meta_raspberrypi_recipes_kernel_linux_linux_raspberrypi_dev_bb(d)
0016:__anon_80__home_zxp_mender_yocto_layers_poky_meta_classes_kernel_bbclass(d)
0017:__anon_18__home_zxp_mender_yocto_layers_poky_meta_classes_kernel_uimage_bbclass(d)
0018:__anon_158__home_zxp_mender_yocto_layers_poky_meta_classes_siteinfo_bbclass(d)
0019:__anon_18__home_zxp_mender_yocto_layers_poky_meta_recipes_kernel_linux_linux_yocto_inc(d)
File: '/home/zxp/mender-yocto/layers/meta-raspberrypi/recipes-kernel/linux/linux-raspberrypi-dev.bb', lineno: 3, function: __anon_6__home_zxp_mender_yocto_layers_meta_raspberrypi_recipes_kernel_linux_linux_raspberrypi_dev_bb
0001:python __anonymous() {
0002: if "linux-raspberrypi-dev" not in d.getVar("PREFERRED_PROVIDER_virtual/kernel"):
*** 0003: msg = "Skipping linux-raspberrypi-dev as it is not the preferred " + \
0004: "provider of virtual/kernel."
0005: raise bb.parse.SkipRecipe(msg)
0006:}
0007:
Exception: TypeError: getVar() missing 1 required positional argument: 'expand'
ERROR: Failed to parse recipe: /home/zxp/mender-yocto/layers/meta-raspberrypi/recipes-kernel/linux/linux-raspberrypi-dev.bb
Yeah branch names. You must use the same branch name on all of them, otherwise you will end up with strange errors. Branch names code names for Yocto release. “rocko” means 2.4 and by using the “rocko” branch on all layers you make sure that you are on the same release for all the included components.
It should look something like this:
Pleases let me know if this works for you and I can update my article with this information.
Also check out this link for some additional local.conf change needed to be done for raspberrypi boards when using Mender.
Mirzak,
I get the follow error message.
my own bblayers.conf is shown below
Can you give more instruction?
Peter.
It seems to me that you got the wrong branch of meta-raspberrypi.
I have setup a repo which simplifies the build setup a bit, at least tries to automate it.
Check out this: https://github.com/mirzak/mender-raspberrypi-manifest/tree/rocko
Hello Mirzak,
Thank you for this great article.
Do you know if mender supports custom updates ? I need to update fpga firmware so this requires probably to write my own updater, but have not found this issue documentation.
Another thing, I see you have also talked before about swupdate.
From your experience which updater will you choose between swupdate and mender for a new project?
Thanks
Ranran
Hi, thank you for the nice feedback. Mender does support custom updates with the upcoming 2.0 release, you can read more here.
As I nowadays get payed to work full time with Mender I can not answer this question 🙂
This article is great.
But I am somehow facing this error. I have two data partitions one contains the “U-boot” and the other contains the “mender and lost+found” files. The data partition containing “mender and lost+found” file overlays the data partition containing “u-boot”. Why is these files not showing in a single data partition? I have to unmount /data to get access to /data/U-boot.
Mirzak
Thanks for the article.
I need to use my cloud server so that I will copy the .mender file to that server and the mender-client will download updates from the cloud server.
How to proceed to do this?
Hi Mirza,
can I update the device by storing .mender file in USB stick? How can I achieve this?