This post if part of the “Updating embedded Linux devices” series, previous posts are:
First up on my software update journey is:
In 2014 I attended ELCE (Embedded Linux Conference Europe) in Düsseldorf, Germany, and this is also the time and place when I was introduced to SWUpdate when Stefane Babic did a talk about this new project that he had started withing DENX. Was a great presentation and I left that session with a lot of new insights on the topic.
SWupdate has since then grown in to an mature project with an active community, I try to keep up on what is happening in the project on the mailing list but it is getting tougher to keep up as there is much going on. At the time of me writing this there has been 16 releases and now days a new release is done every 3-4 months, a very healthy release cycle in my opinion.
But what is SWUpdate?
SWUpdate is an highly configurable and feature rich update agent (written mostly in C). It does not enforce one specific kind of usage (strategy) but instead provides a set of tools giving one the possibility to fit it to your specific needs. In other words it is an framework to enable software updates on you embedded Linux device.
Key features:
- flexible update image format (.swu)
- Syntax is one of
- libconfig (default)
- JSON
- XML with an Lua parser
- Supports targeting multiple targets/revisions with the same image file
- Syntax is one of
- Supports the common storage mediums trough different handlers
- eMMC/SD,
- Raw flash (NAND, NOR, SPI-NOR)
- UBI volumes
- extensible with custom handlers in C or in Lua
- Extensible with OTA support
- Relies on Hawkbit for the server part
- Webserver can be activated to upload updates to device
- IPC trough a domain socket to get progress information on update
- Support for encrypted/signed update images
- Supports a master/slave approach, master can update multiple slaves running SWUpdate
There is a lot more features, and you can read more about them here
The most common usage of SWUpdate is to do image based updates using a “Single Copy” or a “Dual Copy” strategy. SWUpdate does support updating single files on you root file-system or other partitions but I would assume that this is only used in some specific cases such as updating some configuration file on a “data” partition.
Lets get our hands dirty. But wait, what are the requirements of running SWUpdate. I do not mean the dependencies to compile the program but the requirements on the platform to be able to perform image based updates. Well first of you must use a storage medium which SWUpdate supports and there exists a handler for it, otherwise you need to write one but you are pretty safe here as SWUpdate supports the most common mediums used on a embedded device. Secondly you need a boot-loader which will have handle the “Dual Copy” switching or the entrance to the “Recovery OS” in a “Single Copy” mode. This is normally done by modifying some variable that both Linux and the boot-loader have access to (environment variables). SWUpdate currently supports U-boot and GRUB as boot-loaders.
I will be using a Beablebone Black as reference board which ticks of the requirements and I was thinking of doing the following as a first step:
- Install the latest official debian image on by board
- Download and compile SWUpdate natively on BBB (to keep it simple)
- Perform a “raw file” update, that is we will update an single file
This is probably not something that I recommend for my readers to do as this is a quite manual process and I am only doing this to provide some insight in the different steps of doing an update with SWUpdate on a “concept” level. This is probably not something that you can re-use a production environment.
I will later on do the same thing using Yocto which is a more production ready approach.
Lets flash an SD card with the latest BBB debian image (at the time of me writing this the latest image was 2017-10-10, this could have changed but should work with newer images as well):
|
1 2 3 4 |
$ wget https://debian.beagleboard.org/images/bone-debian-9.2-iot-armhf-2017-10-10-4gb.img.xz $ unxz bone-debian-9.2-iot-armhf-2017-10-10-4gb.img.xz $ sudo dd if=bone-debian-9.2-iot-armhf-2017-10-10-4gb.img of=/dev/mmcblk0 |
Insert the card and boot it.
|
1 2 3 4 5 6 7 8 9 10 |
Debian GNU/Linux 9 beaglebone ttyS0 BeagleBoard.org Debian Image 2017-10-10 Support/FAQ: http://elinux.org/Beagleboard:BeagleBoneBlack_Debian default username:password is [debian:temppwd] beaglebone login: |
Before we can proceed we need to install some extra packages on our “fresh” image that are needed by SWUpdate:
|
1 2 3 |
debian@beaglebone:~$ sudo apt-get install lua5.2-dev libssl-dev libconfig-dev libarchive-dev \ libzmq3-dev libz-dev libcurl4-gnutls-dev libjson-c-dev |
Now we download the SWUpdate source (2017.11 was the latest release at the time of writing this):
|
1 2 |
debian@beaglebone:~$ git clone https://github.com/sbabic/swupdate.git -b 2017.11 && cd swupdate |
SWUpdate uses the same build system as the Linux kernel (Kbuild) which might be familiar to some. This means that there are a set of pre-defined configuration files that we can use to configure and build SWUpdate.
|
1 2 3 4 5 6 7 8 9 10 11 12 13 14 15 16 |
debian@beaglebone:~/swupdate$ ls configs/ -1 cms1_defconfig cms_defconfig debian_defconfig hawkbit_defconfig nodwl_defconfig raspi_defconfig sha256_defconfig swuforwarder_defconfig test_defconfig with_lua_handlers_defconfig with_lua_nohandlers_defconfig without_libconfig_defconfig without_lua_defconfig with_systemd_defconfig |
We are going to use test_defconfig which is convenient for our test purpose. Some key features that are enabled/disabled
- No bootloader support (we do not want this feature at this stage as this requires some integration work on the board)
- Webserver enabled
- Signed/Encrypted images
- Support to download update image from URL
Lets configure our project:
|
1 2 |
debian@beaglebone:~/swupdate$ make test_defconfig |
And we can use menuconfig to browse/change the configuration of our project
|
1 2 |
debian@beaglebone:~/swupdate$ make menuconfig |

But we are happy with the options enabled in test_defconfig so we are not gonna make any additional changes.
Lets build and install:
|
1 2 |
debian@beaglebone:~/swupdate$ make && sudo make install |
If we try and start the binary that we have compiled we get the following error:
|
1 2 3 4 5 6 7 8 9 |
debian@beaglebone:~$ swupdate Swupdate v2017.11.0 Licensed under GPLv2. See source distribution for detailed copyright notices. swupdate built for signed image, provide a public key file < ... > |
Since we enabled support for signed images we must provide a public key and all update images must be signed with the corresponding private key.
Lets create a key-pair, we will do it on the BBB for convenience
|
1 2 3 4 5 6 7 |
# Create private key debian@beaglebone:~$ openssl genrsa -out swupdate-priv.pem # Create a public key debian@beaglebone:~$ openssl rsa -in swupdate-priv.pem -out swupdate-public.pem \ -outform PEM -pubout |
And now we can start SWUpdate
|
1 2 3 |
debian@beaglebone:~$ sudo swupdate -v -k /home/debian/swupdate-public.pem \ -w "-document_root /home/debian/swupdate/www" |
Since we built SWUpdate with the web-server enabled we can now go to our browser and go to http://<device ip>:8080/, and we will be presented with this:
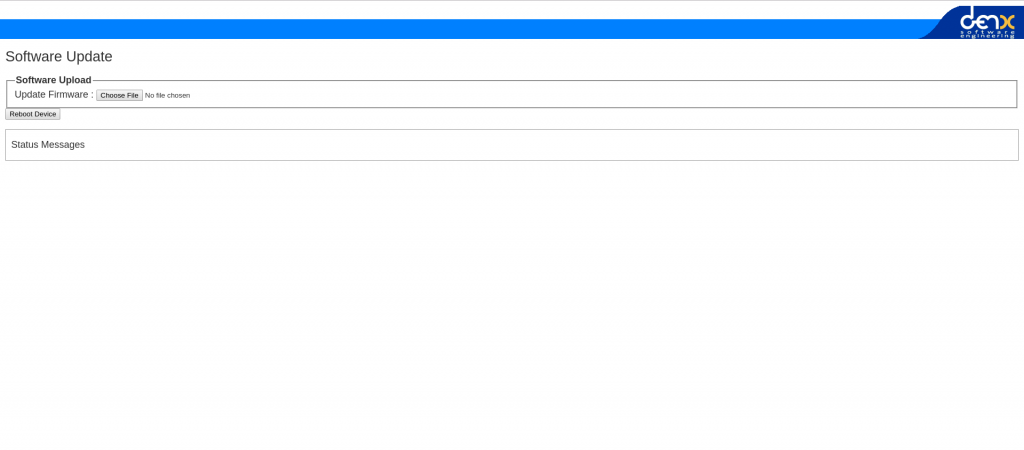
Very simple web-interface that allows us to upload an update image, and its power is really in that it is so simple and you need it to be. If you have devices in the “wild” and can not provide updates over-the-air, you will rely on people that are maybe not as technologically advanced as you are to update devices, and then simplicity is key!
We have not yet created a update image so we can not upload anything, or well I tried uploading some random file trying to fool it but as expected it did not like that very much:
|
1 2 3 4 5 6 7 8 9 10 11 12 13 14 15 16 |
[network_initializer] : Main loop Daemon Waiting for requests... [network_initializer] : Main thread sleep again ! Image invalid or corrupted. Not installing ... ERROR core/cpio_utils.c : extract_cpio_header : 316 : CPIO Header corrupted, cannot be parsed ERROR core/cpio_utils.c : get_cpiohdr : 44 : CPIO Format not recognized: magic not found Software Update started ! File information: random-file.zip size: 364724005 bytes |
So lets try and construct a valid update image instead. First we must create a sw-description file, which shall contain a set of instruction to SWUpdate (what to install/update and where). The default syntax for this file is based on libconfig and it looks like this in our simple case:
|
1 2 3 4 5 6 7 8 9 10 11 12 13 14 15 |
software = { version = "1.0.1"; beaglebone = { hardware-compatibility: [ "1.0" ]; files: ( { filename = "SWUpdate"; path = "/SWUpdate"; sha256 = "27ebafbe58603437d819cde3470811e5e64a8aa876a4fa680e5266e36bbee519"; } ); }; } |
We want to update/install the file SWUpdate and the location on the target is /SWUpdate. Simple enough. The sw-description files are highly configurable and I will not try and to cover every aspect of it here as it already documented here.
Our sw-description file says that it is only compatible with the hardware version 1.0 of the beaglebone board. SWUpdate parses /etc/hwrevision on start-up to figure out which board it is running and what version. We must provide this file and it must contain the same information that we have provided in our sw-description file:
|
1 2 |
echo "beaglebone 1.0" > /etc/hwrevision |
And we must restart SWUpdate because it only parses this on start-up.
We must also create the SWUpdate file that we want install/update and we should end up with this:
|
1 2 3 4 5 6 7 8 9 10 11 12 13 14 15 16 17 18 19 20 21 |
root@beaglebone:~/update-image# ls sw-description SWUpdate root@beaglebone:~/update-image# cat sw-description software = { version = "1.0.1"; beaglebone = { hardware-compatibility: [ "1.0" ]; files: ( { filename = "SWUpdate"; path = "/SWUpdate"; sha256 = "27ebafbe58603437d819cde3470811e5e64a8aa876a4fa680e5266e36bbee519"; } ); }; } root@beaglebone:~/update-image# cat SWUpdate SWUpdate v1 |
The format of the update image that SWUpdate expects is an cpio archive and the sw-description file must be the first file in the archive. To achieve this we can run the following:
|
1 2 3 4 5 6 7 8 |
root@beaglebone:~/update-image# export FILES="sw-description SWUpdate" root@beaglebone:~/update-image# for i in $FILES; do echo $i; done | cpio -ov -H crc > update-image-v1.swu sw-description SWUpdate 3 blocks root@beaglebone:~/update-image# ls sw-description SWUpdate update-image-v1.swu |
And we have just created our first SWUpdate update image file! Lets try and upload it trough the web-interface:
(pasting log from web-interface instead of screen-shoots from now on)
|
1 2 3 4 5 6 7 8 9 10 11 12 13 14 15 16 |
[network_initializer] : Main loop Daemon Waiting for requests... [network_initializer] : Main thread sleep again ! Image invalid or corrupted. Not installing ... [extract_file_to_tmp] : description file name not the first of the list: SWUpdate instead of sw-description.sig [extract_file_to_tmp] : Found file: filename sw-description size 243 Software Update started ! File information: update-image-v1.swu size: 1024 bytes |
It is complaining that our image is corrupted or invalid. It is not super obvious what is wrong here, but I intentionally uploaded an image that is not signed and was expecting it to fail. Since we built SWUpdate with “signed image” support it will not accept images that are not signed with a private key that matches the public key we provided when we started SWUpdate.
So lets try this again. To add a signature to our update image we must create the sw-description.sig file and it needs to be placed in the cpio archive directly after the sw-description file.
To create an signature we must run the following:
|
1 2 |
root@beaglebone:~/update-image# openssl dgst -sha256 -sign ~/swupdate-priv.pem sw-description > sw-description.sig |
And re-create the cpio archive:
|
1 2 3 4 5 6 7 |
root@beaglebone:~/update-image# export FILES="sw-description sw-description.sig SWUpdate" root@beaglebone:~/update-image# for i in $FILES; do echo $i; done | cpio -ov -H crc > update-image-v1.swu sw-description sw-description.sig SWUpdate 3 blocks |
And upload the file again:
|
1 2 3 4 5 6 7 8 9 10 11 12 13 14 15 16 17 18 19 20 21 22 23 24 25 26 27 28 29 30 31 32 33 34 35 36 37 38 39 40 |
[network_initializer] : Main loop Daemon Waiting for requests... [network_initializer] : Main thread sleep again ! SWUPDATE successful ! [install_raw_file] : Installing file SWUpdate on /SWUpdate [install_single_image] : Found installer for stream SWUpdate rawfile Installation in progress [network_initializer] : Valid image found: copying to FLASH [extract_files] : Found file: filename SWUpdate size 12 required [check_hw_compatibility] : Hardware compatibility verified [check_hw_compatibility] : Hardware beaglebone Revision: 1.0 [swupdate_verify_file] : Verified OK [swupdate_verify_file] : Verify signed image: Read 332 bytes [parse_files] : Found File : SWUpdate --> /SWUpdate (ROOTFS) [parse_hw_compatibility] : Accepted Hw Revision : 1.0 [parse_cfg] : Version 1.0.1 [extract_file_to_tmp] : Found file: filename sw-description.sig size 256 [extract_file_to_tmp] : Found file: filename sw-description size 332 Software Update started ! File information: update-image-v1.swu size: 1536 bytes |
Success! And we can see that the file got installed:
|
1 2 3 |
root@beaglebone:~# cat /SWUpdate SWUpdate v1 |
SWUpdate also exposes an API for third party applications to monitor progress of an update and provides some control as well of the process. A client library is provided which communicates trough an Unix Domain Socket with the SWUpdate process.
There are a couple of reference applications that was built together with SWUpdate that utilize the client library.
|
1 2 3 4 5 6 7 8 9 10 |
debian@beaglebone:~/swupdate/tools$ ./progress --help ./progress (compiled Jan 21 2018) Usage ./progress [OPTION] -c, --color : Use colors to show results -r, --reboot : reboot after a successful update -w, --wait : wait for a connection with SWUpdate -p, --psplash : send info to the psplash process -s, --socket <path> : path to progress IPC socket -h, --help : print this help and exit |
And this is one example what it can look like when it is running while performing an update:
|
1 2 3 4 5 6 7 8 9 10 11 |
debian@beaglebone:~/swupdate/tools$ ./progress Trying to connect to SWUpdate... Connected to SWUpdate via /tmp/swupdateprog Update started ! Interface: UNKNOWN [ ============================================================ ] 1 of 1 100% (SWUpdate) SUCCESS ! |
Above could be used to display information about the update process if your device has a graphical interface. One can also start or stop an update trough the client library API, meaning that the application can be in full control when the update can be started.
Moving forward my intention is to do a more advanced setup using SWupdate. For this we will utilize Yocto where SWUpdate is supported with the meta-swupdate layer. There is also a layer provided a reference implementation of “Dual Copy” strategy on BBB and Raspberry Pi 3 boards, meta-swupdate-boards.
For this we must setup our Yocto environment:
|
1 2 3 4 5 6 7 8 9 10 11 12 13 |
$ mkdir swupdate-yocto && cd swupdate-yocto swupdate-yocto$ mkdir layers && cd layers swupdate-yocto/layers$ git clone git://git.yoctoproject.org/poky -b rocko swupdate-yocto/layers$ git clone git://github.com/openembedded/meta-openembedded.git -b rocko swupdate-yocto/layers$ git clone https://github.com/sbabic/meta-swupdate -b rocko swupdate-yocto/layers$ git clone https://github.com/sbabic/meta-swupdate-boards.git -b master swupdate-yocto/layers$ cd .. swupdate-yocto$ . layers/poky/oe-init-build-env build swupdate-yocto/build$ bitbake-layers add-layer ../layers/meta-openembedded/meta-oe swupdate-yocto/build$ bitbake-layers add-layer ../layers/meta-swupdate swupdate-yocto/build$ bitbake-layers add-layer ../layers/meta-swupdate-boards |
Update:
Setup raspberrypi3 build:
|
1 2 3 4 5 6 7 8 9 10 11 12 13 14 15 16 17 18 |
$ mkdir swupdate-yocto && cd swupdate-yocto swupdate-yocto$ mkdir layers && cd layers swupdate-yocto/layers$ git clone git://git.yoctoproject.org/poky -b rocko swupdate-yocto/layers$ git clone git://github.com/openembedded/meta-openembedded.git -b rocko swupdate-yocto/layers$ git clone https://github.com/sbabic/meta-swupdate -b rocko swupdate-yocto/layers$ git clone https://github.com/sbabic/meta-swupdate-boards.git -b master swupdate-yocto/layers$ git clone https://github.com/agherzan/meta-raspberrypi.git -b rocko swupdate-yocto/layers$ cd .. swupdate-yocto$ . layers/poky/oe-init-build-env build swupdate-yocto/build$ bitbake-layers add-layer ../layers/meta-openembedded/meta-oe swupdate-yocto/build$ bitbake-layers add-layer ../layers/meta-openembedded/meta-multimedia swupdate-yocto/build$ bitbake-layers add-layer ../layers/meta-openembedded/meta-python swupdate-yocto/build$ bitbake-layers add-layer ../layers/meta-openembedded/meta-networking swupdate-yocto/build$ bitbake-layers add-layer ../layers/meta-raspberrypi swupdate-yocto/build$ bitbake-layers add-layer ../layers/meta-swupdate swupdate-yocto/build$ bitbake-layers add-layer ../layers/meta-swupdate-boards |
NOTE! In above example i clone meta-swupdate-boards from my own fork as I found some issues that needed to be fixed for this to work. I plan to send these fixes upstream so that I can remove my fork.
Edit: Patches are now upstream (master branch only though)
And now we can build an image:
|
1 2 |
swupdate-yocto/build$ MACHINE=beaglebone bitbake update-image |
or
|
1 2 |
swupdate-yocto/build$ MACHINE=raspberrypi3 bitbake update-image |
I have used beaglebone as my target and that is what I will refer to from now on.
Time for a coffee!
Hopefully the build finished successfully and there are two images that are of interest to us:
core-image-full-cmdline-beaglebone.wic– Image to write to the eMMC on the BBB, which will contain SWUpdate which is also started at boot-up. We have to utilize the eMMC because the boot partition logic is setup to utilize thisupdate-image-beaglebone.swu– This is the update image we will provide to SWUpdate, and it contains the full root-filesystem
We transfer the core-image-full-cmdline-beaglebone.wic image to our BBB that is running the debian image that we used earlier.
Write the image to the eMMC:
|
1 2 |
debian@beaglebone:~$ sudo dd if=core-image-full-cmdline-beaglebone.wic of=/dev/mmcblk1 bs=1M |
Eject the uSD card, to make sure that it does not boot from there anymore and restart the device (power-cycle).
Once we have booted from the eMMC we can see that SWUpdate is running on our image already:
|
1 2 3 4 5 6 |
root@beaglebone:~# ps ax | grep swupdate 503 ? S 0:00 /usr/bin/swupdate-progress -w -p -r 504 ? Sl 0:00 /usr/bin/swupdate -v -H beaglebone 1.0 -e stable,copy2 -f /etc/swupdate.cfg -u -w 530 ? Sl 0:00 /usr/bin/swupdate -v -H beaglebone 1.0 -e stable,copy2 -f /etc/swupdate.cfg -u -w 531 ? S 0:00 /usr/bin/swupdate -v -H beaglebone 1.0 -e stable,copy2 -f /etc/swupdate.cfg -u -w |
One interesting take away from above is that there is an -H option to provide board and hardware revision, which we earlier provided trough the /etc/hwrevision file.
Also one interesting thing that might seem confusing is that if we look at how our eMMC is partitioned:
|
1 2 3 4 5 6 7 8 9 10 11 12 |
root@beaglebone:~# fdisk -l /dev/mmcblk1 Disk /dev/mmcblk1: 1.8 GiB, 1920991232 bytes, 3751936 sectors Units: sectors of 1 * 512 = 512 bytes Sector size (logical/physical): 512 bytes / 512 bytes I/O size (minimum/optimal): 512 bytes / 512 bytes Disklabel type: dos Disk identifier: 0x9bf174dc Device Boot Start End Sectors Size Id Type /dev/mmcblk1p1 * 8 42605 42598 20.8M c W95 FAT32 (LBA) /dev/mmcblk1p2 42608 325475 282868 138.1M 83 Linux |
We do not have a second partition for our root file-system, but I said that we where going to deploy a “Dual Copy” strategy (if you need to refresh your memory regarding update strategies). What will happen is that when we run our first update the update image will run a script (which is embedded) that will do the eMMC setup. This could have been taken care of during “build-time” using a custom WIC file but this will work as well for our test.
Actually lets take a look at the sw-description file that is in meta-swupdate-boards:
|
1 2 3 4 5 6 7 8 9 10 11 12 13 14 15 16 17 18 19 20 21 22 23 24 25 26 27 28 29 30 31 32 33 34 35 36 37 38 39 40 41 42 43 44 45 46 47 48 49 50 51 52 53 54 55 56 57 58 59 60 61 62 63 64 65 66 |
software = { version = "0.1.0"; beaglebone = { hardware-compatibility: [ "1.0"]; stable : { copy1 : { images: ( { filename = "core-image-full-cmdline-beaglebone.ext4.gz"; device = "/dev/mmcblk1p2"; type = "raw"; installed-directly = true; compressed = true; } ); scripts: ( { filename = "emmcsetup.lua"; type = "lua"; } ); uboot: ( { name = "boot_targets"; value = "legacy_mmc1 mmc1 nand0 pxe dhcp"; }, { name = "bootcmd_legacy_mmc1"; value = "setenv mmcdev 1;setenv bootpart 1:2; run mmcboot"; } ); }; copy2 : { images: ( { filename = "core-image-full-cmdline-beaglebone.ext4.gz"; device = "/dev/mmcblk1p3"; type = "raw"; installed-directly = true; compressed = true; } ); scripts: ( { filename = "emmcsetup.lua"; type = "lua"; } ); uboot: ( { name = "boot_targets"; value = "legacy_mmc1 mmc1 nand0 pxe dhcp"; }, { name = "bootcmd_legacy_mmc1"; value = "setenv mmcdev 1;setenv bootpart 1:3; run mmcboot"; } ); }; }; } } |
Here we can see that there is a emmcsetup.lua script that will take care of the eMMC setup for us. We can also see an example of how a “Dual Copy” strategy can be setup using SWUpdate. The boot part switching is done using the uboot handlers that will make changes to U-boot environment variables when performing an update.
It is now time to do an update, lets browse to the SWUpdate web-interface and upload the update-image-beaglebone.swu file that we got from our Yocto build.
|
1 2 3 4 5 6 7 8 9 10 11 12 13 14 15 16 17 18 19 20 21 22 23 24 25 26 27 28 29 30 31 32 33 34 35 36 37 38 39 40 41 42 43 44 45 46 |
Waiting for requests... [network_initializer] : Main thread sleep again ! SWUPDATE successful ! [update_bootloader_env] : Updating bootloader environment [start_lua_script] : Calling Lua /tmp/emmcsetup.lua [start_lua_script] : Script output: Post installed script called script end [install_single_image] : Found installer for stream core-image-full-cmdline-beaglebone.ext4.gz raw [start_lua_script] : Script output: Checking that no-one is using this disk right now ... FAILED Disk /dev/mmcblk1: 1.8 GiB, 1920991232 bytes, 3751936 sectors Units: sectors of 1 * 512 = 512 bytes Sector size (logical/physical): 512 bytes / 512 bytes I/O size (minimum/optimal): 512 bytes / 512 bytes Disklabel type: dos Disk identifier: 0x07679a7d Old situation: Device Boot Start End Sectors Size Id Type /dev/mmcblk1p1 * 8 42605 42598 20.8M c W95 FAT32 (LBA) /dev/mmcblk1p2 42608 327017 284410 138.9M 83 Linux >>> Script header accepted. >>> Script header accepted. >>> Script header accepted. >>> Script header accepted. >>> Created a new DOS disklabel with disk identifier 0x07679a7d. /dev/mmcblk1p1: Created a new partition 1 of type 'W95 FAT32 (LBA)' and of size 20.8 MiB. /dev/mmcblk1p2: Created a new partition 2 of type 'Linux' and of size 138.9 MiB. /dev/mmcblk1p3: Created a new partition 3 of type 'Linux' and of size 138.9 MiB. /dev/mmcblk1p4: Done. New situation: Disklabel type: dos Disk identifier: 0x07679a7d Device Boot Start End Sectors Size Id Type /dev/mmcblk1p1 * 8 42605 42598 20.8M c W95 FAT32 (LBA) /dev/mmcblk1p2 42608 327017 284410 138.9M 83 Linux /dev/mmcblk1p3 327018 611427 284410 138.9M 83 Linux The partition table has been altered. Calling ioctl() to re-read partition table. The kernel still uses the old table. The new table will be used at the next reboot or after you run partprobe(8) or kpartx(8). Syncing disks. script end [start_lua_script] : Calling Lua /tmp/emmcsetup.lua Installation in progress [network_initializer] : Valid image found: copying to FLASH [extract_files] : Found file: filename core-image-full-cmdline-beaglebone.ext4.gz size 31829134 required [extract_files] : Found file: filename emmcsetup.lua size 1691 required [check_hw_compatibility] : Hardware compatibility verified [check_hw_compatibility] : Hardware beaglebone Revision: 1.0 [parse_bootloader] : Bootloader var: boot_targets = legacy_mmc1 mmc1 nand0 pxe dhcp [parse_bootloader] : Bootloader var: bootcmd_legacy_mmc1 = setenv mmcdev 1;setenv bootpart 1:3; run mmcboot [parse_scripts] : Found Script: emmcsetup.lua [parse_images] : Found compressed Image : core-image-full-cmdline-beaglebone.ext4.gz in device : /dev/mmcblk1p3 for handler raw [parse_hw_compatibility] : Accepted Hw Revision : 1.0 [extract_file_to_tmp] : Found file: filename sw-description size 1138 Software Update started ! File information: update-image-beaglebone.swu size: 31832576 bytes |
Success! We need to reboot the device for the update to have any effect. There is a button conveniently placed in the web-interface to trigger a reboot.
We can see now that the devices has changed root file-system part to /dev/mmcblk1p3 which was created during our update as can be seen in above log.
|
1 2 3 4 |
root@beaglebone:~# mount /dev/mmcblk1p3 on / type ext4 (rw,relatime,data=ordered) < ... > |
NOTE! SWUpdate is built without “signed image” support by default in Yocto, there are means to enable it but I will not cover it at this time.
Conclusion
SWUpdate is a mature and feature rich update framework which is fairly easy to setup. I have only covered a fragment of what SWUpdate can do but hopefully it can be helpful to someone.
There is of course a learning curve to using SWUpdate, that is because there are so many configuration options you need to read-up on what you want to use and configure appropriately. But this is also the goal of the project, to be a framework and not an out-of-the box solution.
Also even though there is a fairly good starting point when using Yocto and the SWUpdate layers to deploy a “Dual Copy” strategy (on a BBB and RPi3 at least), this is only for testing purposes and is not in anyway production ready and addition work is needed to make it robust. We are lacking roll-back support is one example of features that need to be implemented for better robustness when using a “Dual Copy” strategy.
One thing that is lacking in the project is testing. From what I can see there are no unit tests nor integration test. To able to maintain such a project which aims to be flexible you need automation to test the very rich feature list. I checked the road-map of the project and sadly it is not even listed there, instead the focus is feature on growth.
I am not criticizing as SWUpdate is mainly a community based project meaning that people develop this on their free time and it is understandable that some infrastructure is missing. If you have a lot of free time go over to SWUpdate and start hacking!
great introduction, thanks
Hi Mirza,
Your new journey below is very helpful for SWUpdate learning.
How to build SWUpdate under target machine is very clear and I did it successful.
But about meta build for Raspberry Pi3 I have some issue below, can you help me?
1. I see some of meta git check out to branch rocko, why? And where I can found those special branch description?
2. I use follow command line to build raspberrypi3
MACHINE=raspberrypi3 bitbake update-imageGet the error message below:
Maybe I need to checkout special branch for some meta item? Do you have any ideas?
Thanks for your kindly help.
Peter.
You also need to clone and add the meta-rasbperrypi layer. That is :
Note that meta-raspberrypi has additional dependencies which means you probably also need to run:
The “rocko” names are Yocto release code names.
Recommended reading:
Mirzak,
After long time waiting for bitbake download&build, still meet some issue below. 🙁
For you reference bblayers.conf attached below
$ cat conf/bblayers.conf
# POKY_BBLAYERS_CONF_VERSION is increased each time build/conf/bblayers.conf
# changes incompatibly
POKY_BBLAYERS_CONF_VERSION = “2”
I have also updated the article with instructions for raspberrypi3 setup.
Mirzak,
Very exciting, follow your instruction, I can build swupdate.git on TX2 target board. And also can access TX2 with web interface and support to do firmware update.
I will read more info and prepare a available update packet, to see the final update result.
Mirzak,
Thanks for this wonderful post!!.
I want to flash yocto based images on raspberrypi 3 like you explained for BBB.
with the steps shared above,the build is successful, I see ‘update-image-raspberrypi3-20180730102745.swu’ created but I don’t images that needs to be flashed to sdcard.
can if I am missing anything, I need to sdcard card image to evaluate this tool.
The images names for Raspberry Pi boards differ in naming and have a “.rpi-sdimg” suffix.
I was able to follow your instructions step by step and everything worked as you have described.
However, when I loaded wic image generated from yocto build, my BBB outputs CCCCCC on RS-232 console. It seems to me that BBB is not finding the bootable partition.
I built core-image-full-cmdline-beaglebone.wic in ubuntu 14.04 and tftp wic image into BBB /tmp. I then ran “dd” command to write to the eMMC (/dev/ per your instruction.
The size of the wic image built is 167301120 bytes.
Are there any steps I should have done after flashing wic image to boot from eMMC?
Any help will be appreciated.
Hi,
I was able to generate core-image-full-cmdline-beagleone.wic and update-image-bleabone.swu image from yocto build per your instructions.
I flashed core-image-full-cmdline-beaglebone.wic image to eMMC.
debian@beaglebone:~$ sudo dd if=core-image-full-cmdline-beaglebone.wic of=/dev/mmcblk1 bs=1M
After power cycle, CCCCCCC is displayed on serial console.
It seems to me that BBB is not finding bootable sector.
Are there any steps I should have done before writing wic image to eMMC?
Thanks.
James
Thanks for posting this. I really appreciate your help. I was wondering a few things:
1. sha256 value: How did you generate this value?
2. emmcsetup.lua : What is the content of this file?
Using the sha256 command,
You can see that here
Hi I am using v 2019.04 and when I am try to run web-server like this:
I am getting following error:
Hello,
Thanks for the wonderful post.
Currently we are using raspberry Pi 3 to explore Swupdate, before using in our production board. We are using Ubuntu 14.04 and poky – pyro. I was able to create, core-image-full-cmdline-raspberrypi3.rpi-sdimg and update-image-raspberrypi3.swu. I have written the *.rpi-sdimg into SD card. When i power-on the raspberry pi(inserted SD card), i could not see any thing on the console. I am doubting, raspberry pi is not getting booted.
Am i missing any step here.
Thanks,
J. Chandra Sekhar
Hi mirzak,
1. I have followed above steps and created a yocto based image(core-image-full-cmdline-beaglebone.wic and update-image-beaglebone.swu) for beaglebone black.
2. I have written core-image-full-cmdline-beaglebone.wic to eMMC using command: sudo dd if=core-image-full-cmdline-beaglebone.wic of=/dev/mmcblk1 bs=1M.
3. I have removed the SD card. After power cycle, in serial console i was able to see the board is getting booting from eMMC. After login as “root”,i could see the message,
[NOTIFY] : SWUPDATE running : [suricatta_wait] : sleeping for 360 seconds.
4. But the issue is, with USB cable connected board is not getting connected to 192.168.7.2. with out that i would not be able to perform swupdate from webserver.
I request you to suggest me, did i miss any step.
Thanks,
J. Chandra Sekhar
I have a generic question. If the private key from the BBB(target board), is used to create a signature, how can one deploy this upgrade when all that is available to the user is a web interface and no access to the private key of the target? Once a system is closed box, there is no way that its private key can be downloaded. As a result, the signature is not created and upgrade cannot be completed.
Hi Mirzak,
So I wanted to update this comment. I actually figured it out.
I am not sure if you are specifying it clearly here but correct if this is already the case, I should mention explicitly though
Build System:
Here the private key and public keys are created and the private key used to create the signature. In my case i used buildroot so we need to copy the public key into the target package folder to ensure that the swupdate starts with the public key.
Target system:
There really nothing that needs to be done. It already has the public key of the build system from where the firmware will arrive. It checks the signature using the public key and moves forward with the update process.
This way there is control on the build system side as opposed to the target.
Even the swupdate website states that at: [https://sbabic.github.io/swupdate/signed_images.html][1] . Here is the excerpt
Hi Mirza,
By following the above description I tried to build update-image for beaglebone in yocto. I got the following issue:
Please help me to resolve this issue.
Thanks & Regards,
Giri Prasad N
.
Hi,
once i run bitbake-layers add-layer ../layers/meta-swupdate-boards in my ubuntu command line i am getting bellow error can you please help any one to resolve issue
ERROR: Layer swupdate-boards is not compatible with the core layer which only supports these series: rocko (layer is compatible with dunfell warrior zeus)
Great article, Mirzak! Thanks very much
Hi Mirzak
I am able build the image for raspberry pi3 and flash the image into the sc card but not able to boot is caused error while booting
please help
i got erro
image is attached in the attachment
Mirzak: I will later on do the same thing using Yocto which is a more production ready approach.
Rakesh: Have you done this Mirzak, if yes please share the link. Please do for OTA to multiple clients
Hi ,
Thanks for the article.
“SWUpdate is built without “signed image” support by default in Yocto, there are means to enable it but I will not cover it at this time”
I need to enable signed images and also make other changes in configuration in Yocto. Can u suggest some ways how to do it.